
 Image 1 of 1
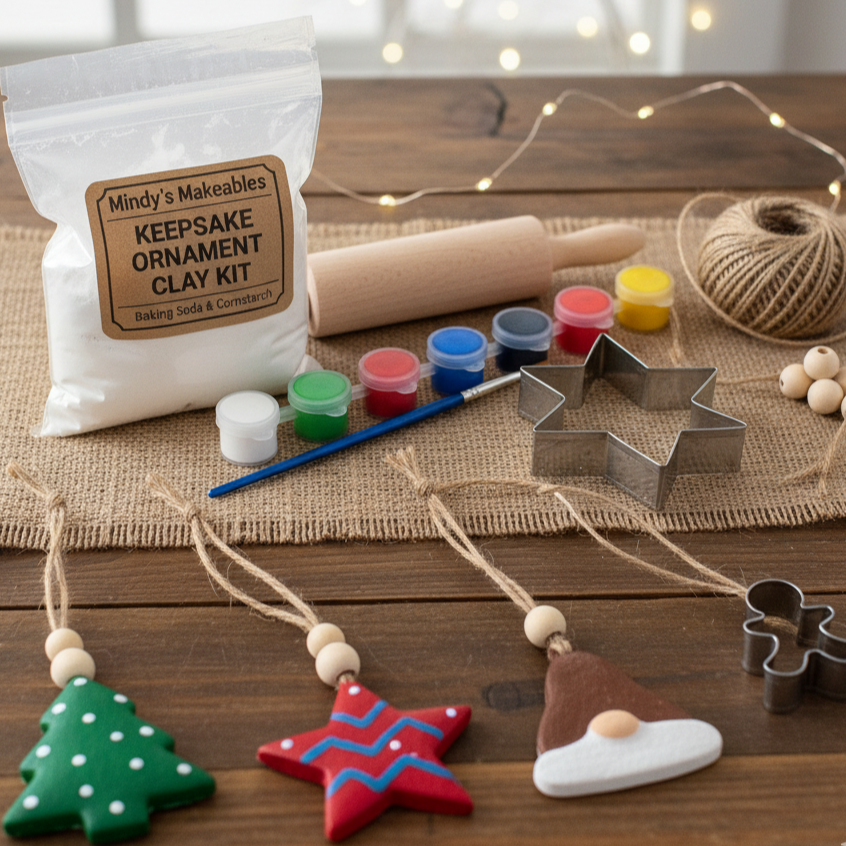
Details:
Materials Included: Pre-measured powder mix (baking soda/cornstarch base), two metal cookie cutters (holiday shapes - one large & one small), six small pots of vibrant paint colors, a small rolling pin, six unfinished wooden beads, some twine to hang your ornaments, and a paintbrush.
Yield: Makes approximately 4-6 medium-sized ornaments, depending on thickness and cookie cutter size.
Age: Recommended for ages 3+ with adult supervision for the cooking step.
Use: Perfect for creating personalized ornaments, gift tags, or small home decor pieces.
Mindy's Makeables - Keepsake Ornament Kit: Directions for Use
This kit is designed to be a fun, no-fuss activity that requires just a little water and your home oven! (Adult supervision recommended for the mixing and baking steps.)
Step 1: Making the Dough (The Fun Cooking Part!)
Creating the dough is quick and easy—just watch for the magic moment when it transforms!
Prep: Pour the entire bag of pre-measured powder mix into a non-stick saucepan.
Add Water: Slowly add 1/2 cup cold water to the dry mix. Whisk thoroughly until the powder is fully dissolved and the mixture is completely smooth.
Cook: Place the saucepan over medium-low heat. Stir constantly with a spatula or wooden spoon. After a few minutes (3–5), the mixture will suddenly thicken into a stiff, moist ball of dough.
Cool & Knead: Immediately remove the dough ball from the pan and place it on a piece of parchment paper. Let it cool for 5–10 minutes until it’s comfortable to touch. Knead the dough until it is soft and smooth. If it feels too sticky, simply sprinkle in a little extra cornstarch and knead it in.
Step 2: Rolling and Cutting Shapes
Time to get creative and form your ornaments!
Roll: Lightly dust a clean surface (like a counter or parchment) with cornstarch. Use a rolling pin (not included) to roll the dough out evenly to a thickness of 1/4 inch. This thickness works best for drying.
Cut: Use the two included cookie cutters to cut out your shapes. Carefully transfer the ornaments to a parchment-lined cooling rack or baking sheet.
Make Hanger Holes: Use a straw or a pencil point to create a clean hole near the top of each ornament for easy hanging later.
Re-roll: Gather any dough scraps, roll them together, and cut out more shapes until you’ve used up all the dough.
Step 3: Drying and Hardening
Patience is key! The ornaments must be completely dry before painting.
Air Dry (Recommended): Place the ornaments on a flat cooling rack for the best airflow. Allow 48–72 hours to fully harden. To prevent curling, remember to flip them over every 12 hours. They are done when they are hard, smooth, and dry to the touch.
Bake (Faster Option): Preheat your oven to 200°F (95°C). Bake for 1 to 2 hours, checking often.
Cool: Let the ornaments cool completely to room temperature before you begin decorating.
Step 4: Paint and Final Touches
Finish your beautiful creations!
Set Up: Use the included paintbrush and six pots of paint to personalize your dried ornaments.
Dry: Allow the paint to dry fully (usually 30–60 minutes).
Seal (Optional): Once the paint is dry, you can brush on a coat of clear craft varnish or sealant (not included) for a beautiful, protected finish.
Hang: Thread a piece of the included twine or ribbon (not included) through the hole, and enjoy your new keepsake!